 Normally the Sonoff switches don’t support MQTT but you can buy flashed devices that run the Tasmota firmware that does.
Alternatively you can flash the switch yourself.
The Sonoff-Tasmota firmware provides three interfaces: MQTT, web (http) and serial that can be used for controlling the switch.
In this tutorial I will cover basic set up of the Sonoff Basic Switch and how to use MQTT and HTTP to control and configure the switch.
Control Button
There is just a single button that is used to control the switch.
It can be used to manually toggle the switch on/off or to place into various configuration mode depending on how often it is pressed.
This link here has an overview of the button options.
Switch Configuration
There are two steps to the configuration:
- Wi-fi Setup
- MQTT Client configuration
Wi-Fi Setup
To configure the Tasmota switch you need to connect it to a Wi-Fi network.
The switch connects to a Wi-Fi network just like you mobile does and so s you will need to configure the SSID and password of that network.
There are several ways of doing this and the configuration methods are covered here under button usage
The easiest method is to use WPS followed by the android App.
If you use the manual method 4 short presses then note the following:
Note: newer firmware uses 6 short presses.
With this option the switch starts as a Wireless Access point. The SSID on mine was sonoffbasic-1122.
You then need to connect a computer to this access point and go to the IP address 192.168.4.1.
You can then enter the SSID and password of the Wi-Fi network you will be connecting the device to.
When you enter this information into the webpage the switch will restart, connect to the Wi-Fi network and acquire an IP address.
Now in order to configure it further you will need to know the IP address it has acquired.
This isn’t as easy as it sounds but the device name on the network seems to be set to the same as the access point.
So you could try to ping this network name which should give you the IP address.
On my network the BT Home Hub displays all connected devices and was able to find the device IP address there. (screenshot below).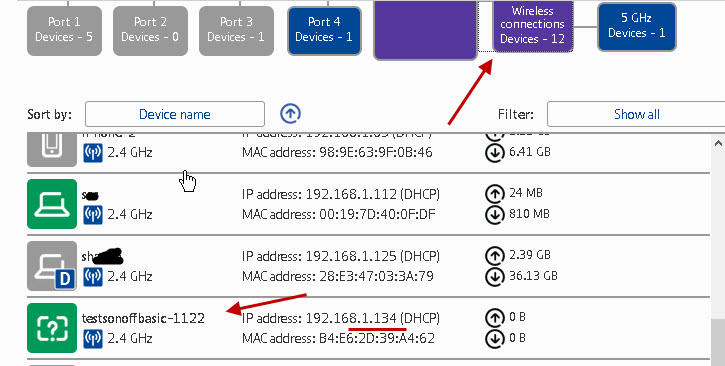
Note: The device doesn’t have a default IP address
Configuring MQTT
The switch will start as an MQTT client and also a web server.
Initial device configuration is done via the web server. To access the configuration page go to
http://Device-IP/cn e.g
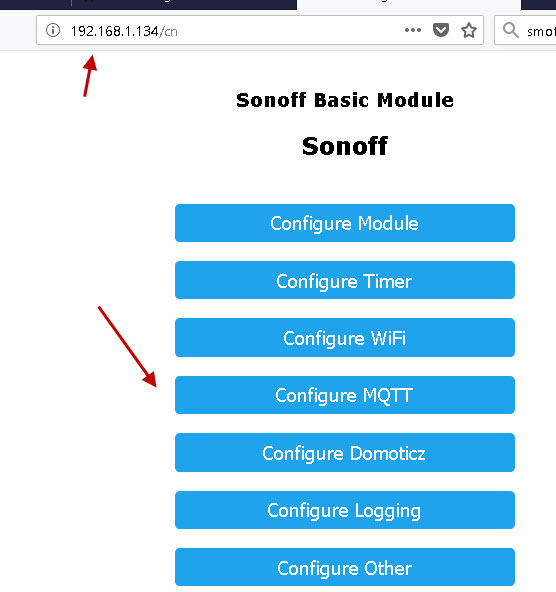
Click on configure MQTT button and you should see the screen similar to the one below:
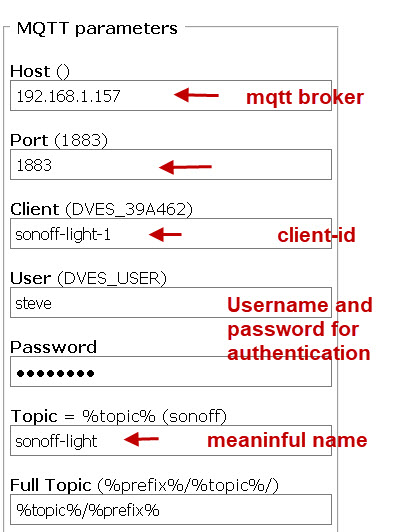
You need to enter:
- The IP address or domain name of the MQTT broker
- The Port (default 1883)
- Client – This is used as the client -id and needs to be unique
- Username – Optional
- Password – Optional
- Topic – The client will publish and subscribe on this topic. The name should be meaningful.
- Full Topic -Defaults to prefix/topic -prefix is stat,cmnd or tele see below under MQTT default topics.
Note: You can use an external broker like test.mosquitto.org but it is better to use a local one. See installing mosquitto or installing mosca on node-red
When finished save the configuration and the switch should restart.
MQTT Host
It is a good idea to use a name rather than IP address as it is more flexible. However to do this you need a local DNS sever like DNSMASQ.
Tasmota MQTT Topics
Sonoff will subscribe to topics to receive control commands . It will also publish status information to topics.
Deciding on the topic structure is an important part of the configuration.
Each Sonoff device has a unique name which you configure in the topic section ( shown above).
This name will reflect the use of the device and should be meaningful e.g
main-light, outside-light etc
The prefix is either cmnd, stat or tele and the choice is usually
prefix +topic (%prefix%/%topic%/) or topic+prefix (%topic%/%prefix%/).
examples:
tele/main-light/ or main-light/tele
tele/#, stat/# and cmnd/# options
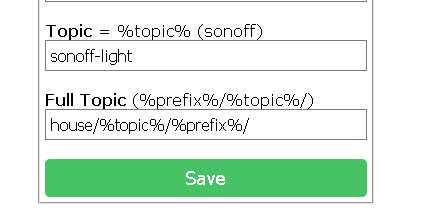
Another option and my preferred option is to add your own prefix.
So if all the Sonoffs were used in your house you could use the topic hierarchy
house/prefix/topic or house/topic/prefix
now you can subscribe to all Sonoff devices using house/#
In this case I prefer house/topic/prefix.
To configure that use:
house/%topic%/%prefix%/
Video
Starting Sonoff
On start the Sonoff device will subscribe to several topics. The exact topics depend on how you have structured the topic hierarchy. Here we are using the structure house/topic/prefix:
- house/main-light/cmnd/#
- house/main-light-1/cmnd/#
- house/sonoffs/cmnd/#
where
- main-light=topic name
- main-light-1= the client name or fallback topic
- sonoffs is the group name.
It also publishes its status and a Last will message wth the retained message flag set..
- house/main-light/stat/POWER ON
- house/main-light/tele/LWT online
Below is a screen shot showing the messages sent by a sonoff device starting up.
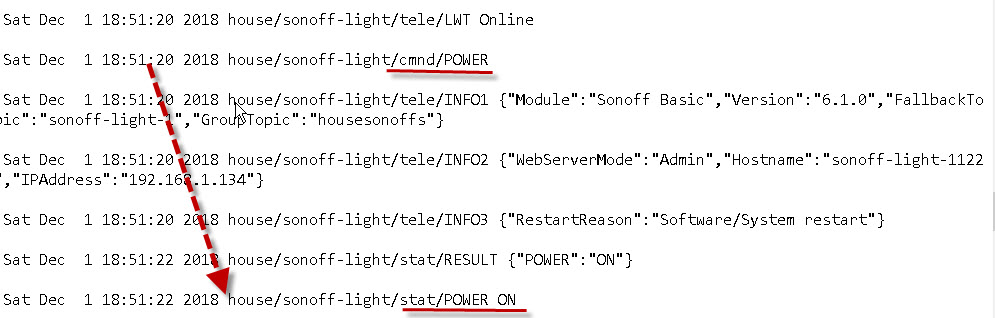
The LWT topic can be checked to determine the online status of the device.
If the switch goes off line then the LWT topic is set to offline by the Last Will and Testament message.
Controlling the Switch
You can control the switch i.e turn it on/off using either http or MQTT.
Tasmota MQTT Commands
This is important to note as some systems may require http and if you have an existing control system that uses http then it might be easier to use that rather than going to MQTT.
This tutorial will mainly cover MQTT but I will also be covering http in another tutorial.
Turning on/off using mqtt
To turn it on/off you publish to the cmnd topic
The exact topic will depend on how you have set the topic structure. Below I use topic/prefix structure so to turn the device sonoff-light on and off I use the topic:
sonoff-light/cmnd/POWER1
With message on or off (case insensitive)
In the example below show how to so it using the mosquitto_pub client.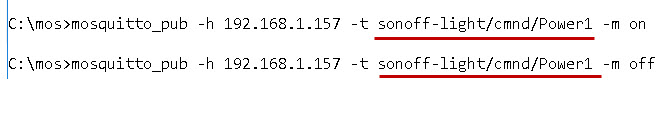
Tasmota HTTP Commands
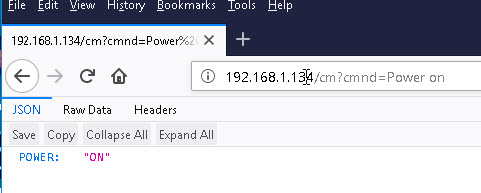
Turning on/off using http
You can use the curl command or easier still a web browser.
Enter the following
http://sonoff ip address/cm?cmnd=Power%20On
my ip address is 192.168.1.134 so I enter
http://192.168.1.134/cm?cmnd=Power%20On
Note: %20 is a space.
MQTT Default Topic Prefixes
The switch publishes and receives information on several topic prefixes, they are:
| Topic | Sent by | Use |
|---|---|---|
cmnd |
PC,Smart Phone using an MQTT client | To control the Sonoff,set configuration and get status information |
stat |
Sent by the Sonoff | Sent in response to a command |
tele |
Status information | Report status information at set intervals |
The above topics are prefixed with the switch topic e.g.
topicbase/stat/
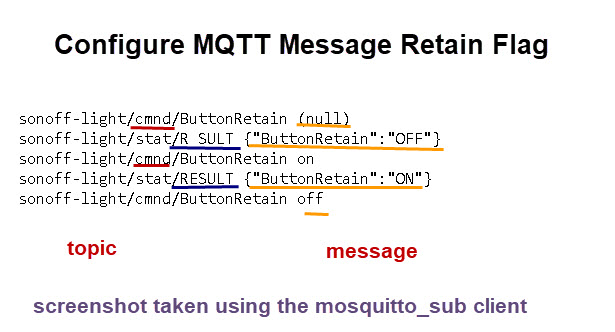
MQTT Commands and Responses
Besides turning the switch on and off, commands can be used to set various settings like the MQTT broker, port retain flag etc and the get information about the switch.
The switch uses a command response structure. Each command is acknowledged with a response.
MQTT commands use the topic structure:
topicbase/cmnd/COMMAND
the result of the command uses the topic
topicbase/stat/RESULT
The result is contained in the message payload.
The screen shot below shows the command response messages for setting the MQTT retain flag on the mqtt client.
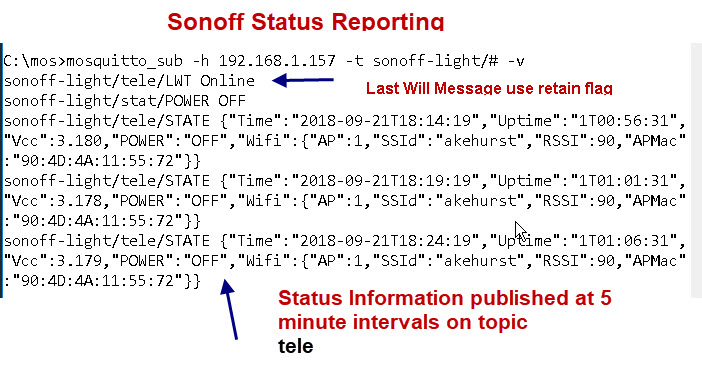
The screen shot below show the status messages that the Sonoff sends at regular intervals,
Setting the Group Topic
A collection of devices can be controlled by setting them to use the same group topic.
If our devices used the group topic housesonoffs for example we could turn a device on or off using:
house/housesonoffs/cmnd/POWER1 with message on or off
![]()
To set the group topic for a device use:
topic house/sonoff-light/cmnd/grouptopic with message group name. As shown below:

You should note that setting a group topic causes the switch to restart as it needs to subscribe to the new topic.
Controlling using MQTT with a Python Demo Script
If you use python I have written a short demo script that you might find useful. You can download it below

Notes
Because changing certain parameters results in a reboot you can change several parameters in one command using the backlog topic see MQTT Features for more details.
Controlling Tasmota Devices Using Node-Red
You can also control tasmota devices using node-red and the MQTT or HTTP protocols.
Finding Tasmota Devices -Node-red Flow
This flow uses http to locate all devices on an IPV4 subnet by trying to connect to a web server page on each IP address.
Resources
- Initial Sonoff configuration
- MQTT Commands
- Tasmota MQTT Features
- Securing Sonoff
- Good video on flashing Sonoff and setup
- List of pre-flashed Tasmota devices
Related Tutorials:
- Introduction to Sonoff Switches
- How to Install Mosquitto on The Raspberry Pi
- Tasmota and Node-Red Project
- Using Tasmota With Home assistant
- Tasmota upgrade notes
- Setting Tasmota Timers with MQTT
Very useful, thanks for this comprehensive article!
One thing I learned which may save others from repeating a problem: when configuring the “host()” field for MQTT, follow the instruction given here (“The IP address or domain name of the MQTT broker”) exactly. I initially just put the hostname of the Raspberry PI where I had installed Mosquitto, and the Tasmota devices cannot resolve that so they could not connect.
– The IP address by itself works
– The hostname by itself does not work
– The domain name (“wgi-rpi.local” in my case) works
Hi
You might find this tutorial useful for understanding why some names work and not others.
https://stevessmarthomeguide.com/name-resolution-and-dns-on-home-networks/
Hello Steve, useful as always!
I have many sonoff basics and minis with tasmota in my homebridge setup, now I am trying with a Sonoff 4CH R2, but even if I put the correct Device Template the relays work fine from the web but does not work from my homebridge (I am using homebridge-mqttthing v1.1.22 plugin). I do not know how to “tell” the system which one is every relay.
Can you (or anyone here) refer me to that config info?
Thanks in advance.
Steve, an excellent tutorial as usual.
Do you have any experience with the Sonoff RF bridge 433?
Thank you.
Yvonne
No afraid not
Rgds
Steve
Hello Steve;
Excellent article. Thank you so much.
I have just under 100 Sonoff Switches in the house and am working (painfully) to switch them over from the ITEAD server to MQTT (on a Universal Device Polisy).
I have a couple of questions concerning the MQTT parameter setup on the Sonoff, given that I have 80+ Sonoff Basics, a few QUADs and DUALS and a few SVs:
1- User/Password: This would be the login information for the MQTT server, correct?
2- Client-ID: would this be where I say Identify the type of switch it is Basic/Dual/Quad/SV followed by a few digits of the MAC, so they remain unique?
3- Topic: fairly self explanatory Bedside_1, Dining_Table etc.
4- Custom Prefix: I like your idea about creating a custom prefix. could be useful for a panic situation, with myHouse/# to turn everything on. As a follow-up, could I have several prefixes? myHouse/garden/… myHouse/garage/… myHouse/CameraFloodLights/… etc. If so, is there a limit to concatenated prefixes?
Cheers
point 1 Yes this is if the broker is configured to use it. If you send it and the broker isn’t configured to use it then the broker just ignores the username/password anyway and processes the message.
point 2 client id just needs to be unique it might also be used to identify the device but the topic usually does that job.
So the sonoff in the garage would publish on myhouse/garage/light and have a client id of anything as you don’t actually see the id of the device that publishes.
point 4 No only the topic length limit.
That was an excellent article. I followed all your steps, I have created a broker on a raspberry pi 3, and I have connected a NodeMCU with Tasmota firmware through MQTT.
Everything is OK and I am able to subscribe with my android phone to a post that the NodeMCU publishes and get all the updates. But my problem is that if my android phone is offline, and NodeMCU makes a publish, when I reconnect with my android phone as a subscriber, I miss the publish NodeMCU made when my phone was offline. I have already configured the mosquitto broker on raspberry pi with persistence true and cleansession false as I have read on other forums.
Is anything I miss and I am not able to get any published messages when my client is offline and online again?
Thank you very much!
Hi
You need to subscribe to the broker with clean sessions set to False and publish and subscribe with a QOS of 1 .
Take a look at this tutorial
http://www.steves-internet-guide.com/mqtt-clean-sessions-example/
Steve,
excellent job, very clear and informative ! Thank you very much !
Just one minor point:
In WIFI configuration, the IP adress of the Access Point is 192.168.4.1 and not 192.168.1.4 (so at least is written in the official Tasmota documentation)
Tks for that I’ve corrected the tutorial
rgds
steve
Excellent first time info , all in one place.
I am planning to experiment on a NODEMCU board with TASMOTA and a simple MQTT Broker on a Raspberry Pi 0/W. This would be a Good starting point.
One thing that I could not easily find on the Net was how to Set the WiFi Credentials with the inbuilt WiFi Manager, which your site helped me in, Thank you.
Only presume that this only switch that’s present on the BASIC and all other SonOff is on GPIO.0
As Marty already mentioned on January 4, 2019 at 5:12 am
I have to thank you with the very same words:
“Perfect. First time I have found all this info in ONE PLACE and easy to understand.”
Thank you so much for sharing this information with a complete newbie to microcontrolers like ESP8266, Devices based on ESP8266 Sonoff devices, Tasmota, Mosquitto, MQTT, MQTT.fx, Node-RED, ioBroker and much more ;o))
Finally there is light at the end of the tunnel ;o)
Greetings from Bochum, Germany
Mario
Eventually!
Great, great job!
Greetings form Milan
Andrea
That was the first time I saw an excellent explanation about sonoff w/ tasmota. Great job! Thank you and congratulations.
Hi Steve,
thanks for your post, while it took a while to flash the Sonoffs the first time they are now available on Amazon in Europe with the Tasmota Firmware flashed already: https://amazon.de/dp/B07CLDDY2G
With that they work directly out of the box as MQTT Clients with your python script.
Thanks and best regards
Daniel
Daniel
Tks for the link. I was looking the other day on Amazon UK and ebay and couldn’t find any flashed devices. I was thinking that I might have to learn how to do it myself, and not looking forward to it!
One suggestion for your description and text is to put MQTT somewhere in it.
Rgds
Steve
Perfect. First time I have found all this info in ONE PLACE and easy to understand.
Thanks so much!
very helpful!! Thank you for breaking it cleary.
Thank you for sharing, exactly what I was looking for rigth now 🙂
Thanks for writing this!
Hi Steve
Great tutorial.
I emailed you a while ago about the sonoff and tasmotta and you said you had just got some and would be doing a tutorial of them.
I was already at the stage you have gone through and I can see in mosquitto on 1883 the status of the lights I have attached and temp sensors working.
Will you be doing a tutorial on how to get this information to a web page ?
This is my sticking point.