Templates are a powerful feature in home assistant that allows you to control information coming into or going out of home assistant.
It is used for:
- Formatting outgoing messages in, for example, the notify platforms .
- Process incoming data from sources that provide raw data, like MQTT, rest sensors or the command_line sensor.
- Automation Templating.
Home assistant uses the Jinja2 templating engine so you need to be familiar with this before you start.
There is is a very good basic tutorial here, but we will cover the basics in the tutorial as we create the code.
For the purpose of this tutorial we will use templating to create a notification when a motion detector detects motion and create an automation that switches on a fan when the temperature goes above a certain temperature.
The actual code for the template is placed in the yaml file but there is a frontend template editor that lets you create and debug the code.
The screen shot below shows the template editor
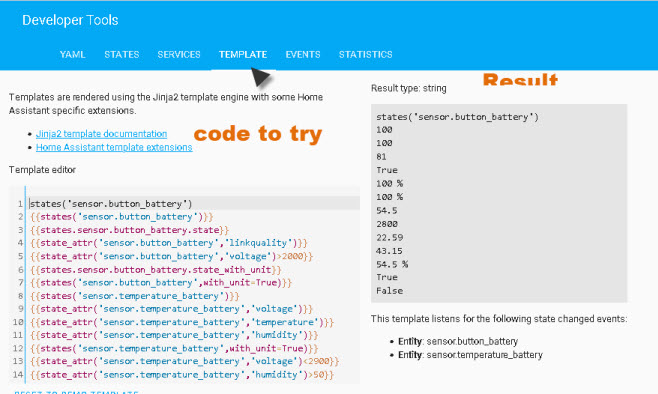
To use it enter the code in the template editor pane and the results are shown on the right in the results pane.
Entity and States
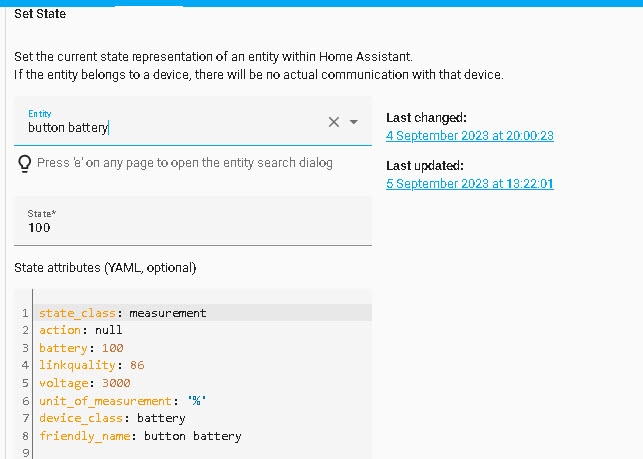
Home assistant stores entity data in a state table. An entity has a state and also optional attributes.
Below is a screen shot of the entity sensor.button_battery (from developer states tab). The state is 100 and the attributes are listed along with their values.
The state table is actually a database table and template extensions provide access to the state table from templates.
Template extensions provide several functions to query the state table, they are:
- states()
- is_state()
- state_attr()
- is_state_attr()
To get the state of sensor.button_battery in a template we can use :
{{states(‘sensor.button_battery’)}} //preferred states is a function
or an alternative form is
{{states.sensor.button_battery.state}}
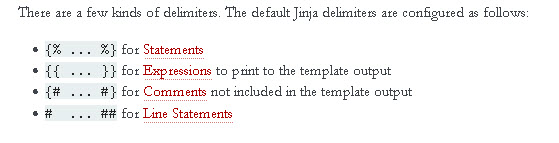
The opening and closing brackets {{..}} enclose an expression that is to be printed to the output.The screen shot below shows other delimiters.
When using the states as a function notice that the entity is in quotes.
We can access the attribute of the entity using state_attr() function.
So to access the voltage we use :
{{state_attr('sensor.button_battery','voltage')}}
and the link quality:
{{state_attr('sensor.button_battery','linkquality')}}
notice we use two parameters in the function call. The entity name and the attribute name.
If we need to check an attribute for a particular value we can use the is_state_attr() function as shown:
{{is_state_attr('sensor.button_battery','voltage',2000}}
This should produce false as the voltage is 3000 . Alternatively we can use
state_attr('sensor.button_battery','voltage')>2000}}
which will produce true.
We can show measurement units of a state in several ways:
{{states.sensor.button_battery.state_with_unit}}
result=100%
{{states('sensor.button_battery',with_unit=True)}}
Self Worked Example:
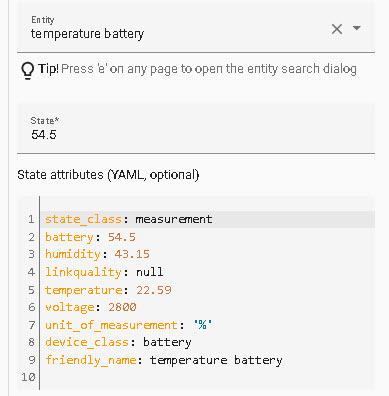
Below is a screen shot showing the attributes for the entity temperature_battery.
Answer the following questions.
Create the commands to display:
Q1- The entity state?
A1- {{states(‘sensor.temperature_battery’)}}
Q2-The temperature value?
A2-Below
Q3 –The humidity value?
A3-Below
Q4 –The voltage value?
A4-{{state_attr(‘sensor.temperature_battery’,’voltage’)}}
Q5 – The sate with units
A5 -Below
Q6 – Check if the voltage is <2900
A6- {{state_attr(‘sensor.temperature_battery’,’voltage’)<2900}}
Q7 – Check if the humidity is >50.
A7-Below
Answers
A2-{{state_attr(‘sensor.temperature_battery’,’temperature’)}}
A3-{{state_attr(‘sensor.temperature_battery’,’humidity’)}}
A5- {{states(‘sensor.temperature_battery’,with_unit=True)}}
A7- {{state_attr(‘sensor.temperature_battery’,’humidity’)>50}}
Part 2 -Automations
In part 2 we look at using templates to create automations.
Related Tutorials and Resources
I need to learn…
1. Where to store this template code?
2. How to name a Template and how to refer to a Template?
3. How is a Template executed or otherwise used.
Graeme
They go in the configuration.yaml file.
You don’t name them as such as they are used for automations/notifications.
Rgds
Steve
I think there is a mistake in your text:
“This should produce false as the voltage is 3000 . Alternatively we can use
state_attr(‘sensor.button_battery’,’voltage’)>2000}}
which again will produce false.”
It will produce true if the voltage is 3000 (greater than 2000)
Tks for pointing that out.
Rgds
Steve