![]() Tasmota devices have 16 timers that you can program to schedule events using either the http or MQTT protocols.
Tasmota devices have 16 timers that you can program to schedule events using either the http or MQTT protocols.
In this tutorial we will focus on using MQTT to set,enable and disable timers.
Most of the examples will use the mosquitto_pub tool but you can use any MQTT publish tool that you prefer.
Time Zone
Before you start working with timers you will need to ensure that your device is in the correct time zone.
I have spent lots of time wondering why the timer didn’t activate because it was in the wrong time zone.
Example: set time zone for device called switch_1 to GMT (0 offset)
mosquitto_pub -h localhost -t cmnd/switch_1/timeZone -m 00:00
Example: Set time zone for device called switch_1 to Paris (1 offset)
mosquitto_pub -h localhost -t cmnd/switch_1/timeZone -m 01:00
Note: The case of the command timezone doesn’t appear to matter.
If you are subscribed to the topic using the filter +/switch_1/# you should see the command that is sent and also the result, as shown below:

Daylight Saving
If you have daylight saving then you can adjust the time to automatically change using TimeStd and timeDst and timeZone 99.
I find it easier to adjust the timezone. In the UK in summer we are 1 hour ahead of GMT so configure the tasmota devices to be in timezone 1, and when the clocks change in the winter put it back to timezone 0.
If your timers aren’t working at the correct time then check the time zone of the device.
Enable and Disable Timers
When you set up an individual timer there is an enable setting however this setting has no effect unless the all timers are enabled.
To enable them send a 1 on the topic timers and a 0 to disable all timers.
You will get two responses the first response will confirms they are enabled the second shows the settings for all of the timers.
mosquitto_pub -h localhost -t cmnd/switch_1/timers -m 1
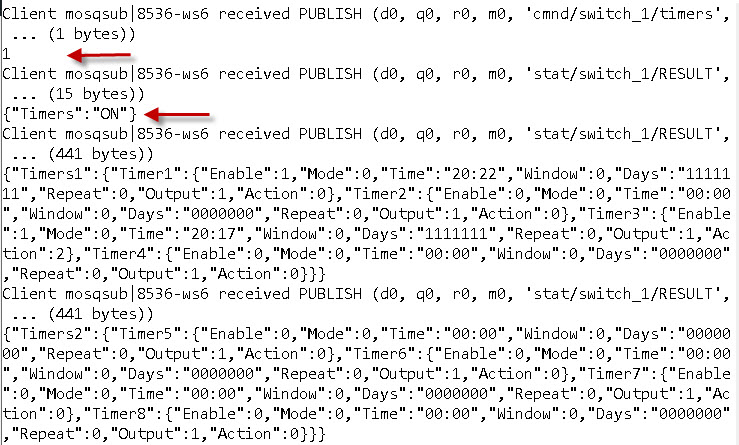
Sending a message on the topic timers with an empty payload will return the timers status and looks like the screen shot above.
Setting Individual Timer Schedules
There are 16 timers that you can set using the topics timer1,timer2,timer3 etc.
Data sent to the timer is JSON encoded and the data keys and meaning in shown here.
I will not cover all of the options here but instead will give several examples using the most common options:
Common options are:
Enable– This allows you do enable/disable individual timers value 0 (disabled) and 1 (enabled)
Days – which days the setting applies to using the form SMTWTFS (starts with Sunday)
A value other that 0 or – means that day is enabled.
so
S0000FS means timer set on Sunday,Friday and Saturday
SM000F0 means timer set on Sunday,Monday and Friday
Time– Uses 24 hour clock with format hh:mm
Repeat – values 0 (=No) and 1(=yes) Should the time repeat on the next day.
So to have the timer repeat every Sunday,Monday and Friday the we use days =SM000F0 and repeat set to 1.
Action -What to do options are- off,on,toggle values are 0,1,2
Output – Some devices have multiple outputs values=1 to 16.
Example: Timer 1 will ENABLE output of POWER1 at exactly 16:30 every Mon/Tue/Wed and Sat
Timer1 {"Enable":1,"Time":"16:30","Window":0,"Days":"-MTW--S","Repeat":1,"Output":1,"Action":1}
Timer2 will Disable output of POWER1 at exactly 21:30 every Mon/Tue/Wed and Sat
Timer2 {"Enable":1,"Time":"21:30","Window":0,"Days":"-MTW--S","Repeat":1,"Output":1,"Action":0}
To set timer1 for switch_1 use:
mosquitto_pub -h localhost -t cmnd/switch_1/TIMER1 -m JSON Payload
Note using the mosquitto_pub tool for sending JSON data is not so easy which is why I use the file method below.
An easier way of sending JSON data without having to use all of the delimiters is to put the JSON data into a file and use the -f switch.
Sample JSON data to set a timer on the tasmota switch and stored in a file called json.txt is shown below:
{“Enable”:1,”Time”:”16:00″,”Window”:0,”Days”:”SMTWTFS”,”Repeat”:1,”Output”:1,”Action”:”1″}
then use the command
mosquitto_pub -h mint2.home -t tasmotas/socket1/cmnd/timer1 -f json.txt
Node-Red Control
If you are a node-red user you can use the debug node as shown in the screen shot below.
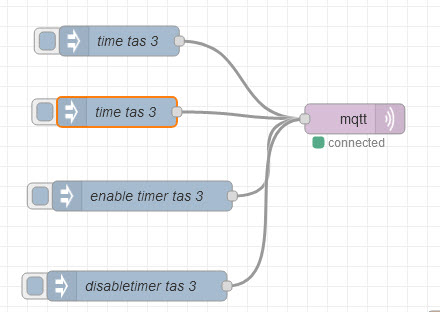
I used these simple inject nodes when developing and testing my timer flow(below). The flow is here:

Node-Red Flow
I am currently finishing off a GUI interface using node red that will let you set the timers on your Tasmota devices it will be part of the Tasmota project.
This is what it currently looks like:

I will be sending an email to my email subscribers when it is done so if you want to get notified than you can join the email list otherwise check back at a later date
Related tutorials and resources:
- Controlling the Tasmota SonOff Switch with Node-Red
- Setting up the Sonoff Tasmota MQTT Switch
- Tasmota Device Network Project
- Upgrading Tasmota Notes
- Introduction to Shelly MQTT