Shelly devices support the MQTT protocol without the need for flashing.
However if you enable this option you loose the ability to control the device from the Shelly cloud.
Compared to Tasmota the Shelly MQTT commands are very basic but they are more than enough for you to operate the switch.
Configuring MQTT on Shelly
To configure MQTT on Shelly you need to connect to the device using http and for that you will need the IP address.
The easiest way to find the IP address is to go to the DHCP server and you should locate it there.
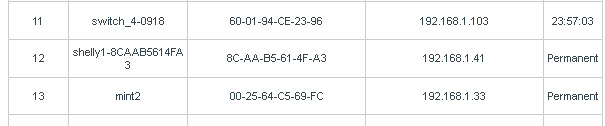
I also have a node-red flow that will locate the IP Tasmota and Shelly devices on a local network.
You will notice that I have configured mine with a static IP address and I would advise you to do the same with all of your IOT devices, and don’t forget to update your network documentation.
The MQTT settings are located under the Internet and Security>Advanced-Developer Settings.
The first thing you will need to do is enable MQTT.

Then you will need to configure:
- Username and password if needed
- MQTT server address and port
- Enable if desired a custom prefix see topics below
- Reconnect time outs
- Clean sessions -Normally left as default =enabled
- QOS – Normally left as default =0
- Retain – default =disabled consider setting to enabled see MQTT notes.
The screen shot below shows my configuration:

The device will broadcast on shellies/shelly-s1/ instead of using the default device name:
shellies/shelly1-8CAAB5614FA3/
Shelly Topics
Shelly devices publish on the topic root shellies and this cannot be changed as far as I can tell.
The topic format is
shellies/device_name/xxx/yyy
common values for xxx=relay,input,online
e.g
shellies/shelly-1234/relay/0
Below is a screen shot of published message/topics of a shelly device
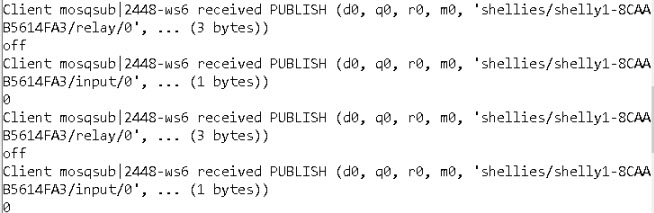
Shelly devices are set to a 30 seconds publish interval even though the switch status hasn’t changed
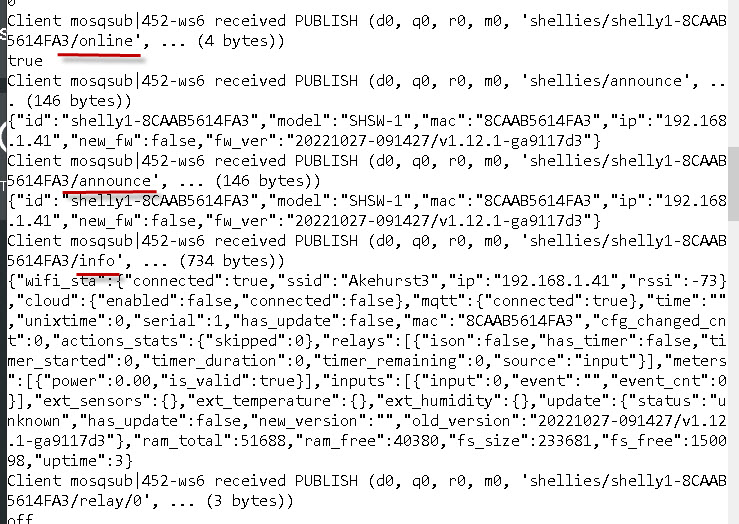
The device also publishes messages when restarted on the topics:
online, announce, info
A screen shot of theses messages and topics is shown below:
note:
The announce is sent on start up and uses the topic formats
shellies/device_name/announce and also shellies/announce

The announce message is shown below:

The info message which is also sent on start up contains more information than the announce. A small part of this message is shown below:

You can also send MQTT command to trigger an announce e.g.
mosquitto_pub -h localhost -t shellies/command -m announce
or for a device.
mosquitto_pub -h localhost -t shellies/device_id/command -m announce
When triggered an announce message and an info message are sent.
Turn Shelly 1 on and off
To turn a shelly 1 switch on and off you need to send an MQTT command on the topic:
shellies/device_name/relay/0/command
valid commands are on.off,toggle as shown below

MQTT Notes
Username and password is basic security supported by the MQTT protocol.
Whether or not you need to use this is determined by the MQTT broker.
Time outs are used for connection retry in the event of a connection failure and there is usually no need to change these.
The keep alive timer is basically a network ping that checks that the MQTT connection is intact. The 60s default value is standard.
The QOS setting is used for message reliability. the values are 0,1,2 with 2 being the most reliable. With a simple device like a switch then 0 is OK. See understanding MQTT QOS for more details.
The clean session setting is used along with QOS 1 and 2 for message delivery. The default value tells the broker not to remember anything about the previous connection and is OK for a simple switch.
The Retain flag is used to tell the broker to remember the last value until it gets a new one. Switches that don’t publish data very often would usually set the flag to true.
The current default on Shellies is a 30 sec publish interval (note state changes are published immediately).
I would set this to true and change the default publish interval to 300 secs.
Setting it to 0 disable regular status updates
Shelly MQTT vs Tasmota MQTT
Shelly MQTT is easier to use as it offers less features than Tasmota.
Tasmota offers many different configuration options like Wi-Fi network switching and multiple brokers, and is the better choice for advanced users who require a high degree of customisation.
Shelly Generations and MQTT
The 2nd generation devices allow much more device control using MQTT than Generation 1 devices.
The table below shows the main differences and features:

Common Questions and Answers
Q-Can I use timers on Shelly devices?
A– Yes but they are configured via http and not MQTT and are much more limited that Tasmota devices.
Q- Can I change MQTT settings using MQTT.
A- No this needs to be done using http.
Q- Can I change device settings e.g Wi-Fi using MQTT.
A- No this needs to be done using http.
Q- Can I change the default publish interval.
A- Yes this is done using http and changing the mqtt_update period.
Related tutorials and resources:
- Setting Tasmota Timers with MQTT
- Introduction to Sonoff Switches
- Setting up the Sonoff Tasmota MQTT Switch
- Understanding Smart Home APIs
- Sonoff vs Shelly
Steve,
re my previous question; it was correctly answered by Copilot 🙁 (distressingly) after I pointed it at the Shelly API docs.
Came back with the version specific command
mosquitto_pub -h 192.168.7.245 -p 1883 -t “shellyplus1pm-/command/switch:0” -m “on,1”