HTTP is currently probably the most widely used control protocol on home networks.
I can be used for local control and also for control over the Internet.
To troubleshoot control problems, and to develop your own control Dashboards and control applications you will need a basic knowledge of HTTP.
HTTP Basics
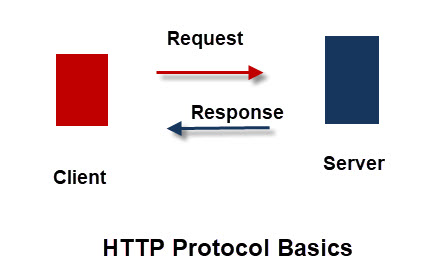
HTTP it is a command and response text based protocol using a client server communications model as shown in the diagram below:

With HTTP the client makes a request and the server responds.
A request consists of:
A command or request method + optional headers + optional body content.
The most common request methods are:
- GET – For reading data from a page
- POST – For sending data to the server usually using a form.
You may wonder why you haven’t seen these request methods when using the web?
This is because the web browser hides the request method from you as it assumes that the method is GET.
You cannot change the request method in the browser but there are addons/extensions that you can use to send other request methods.
Web URLs
A URL (uniform resource locator) commonly known as a web address represents a resource on a network or the Internet. We are all familiar with these as we type them into our web browsers every day.
However most people are unaware of the actual structure as there are parts of the URL which the web browser hides.
However understanding the components that make up a URL is important when dealing with smart home devices.
URL Structure and Components
A request for the web page
http://www.abc.com/homepage.htm
actually looks like this:
http://www.abc.com:80/homepage.htm
if we examine the url strcuture we see it comprises 3 components:
- protocol –HTTP
- Domain Name –www.abc.com
- Port Number –80 (this is the default)
- Resource –homepage.htm
so a request for the webpage :
http://www.abc.com:80/homepage.htm
Is actually sent as :
GET /homepage.htm HTTP/1.1
You may have wondered what has happened to the domain name and port number.
These are not part of the HTTP protocol but are used by the TCP protocol to locate the web server and website.
Most websites use the default port of 80 but you will often see smart home devices using quite different port numbers.
Other Hidden elements that are important are the content headers. You can not change these in the browser but you may need to when sending post requests and JSON data.
Passing Data to a Web Server
There are two ways of passing data to a web server they are:
- In the URL as parameters
- In the Request Body
Using url parameters
These are passed as simple key pairs. Multiple key pairs can be passed by separating them with a comma. The parameter list starts with a question mark e.g
http://mydevices.com/switch?state=on
and
http://mydevices.com/switch?state=on,user=steve,password=secret
Using The Request Body
This is the way web forms pass data to the web server. We cannot do this directly using our web browser but extensions like advanced rest client (chrome) and Rest Client (FireFox) allow you to do this.
However the curl command line client is probably the one you will see most often in examples on the Internet.
All of these tools also allow you to change the content headers sent.
Tasmota Device API Example Usage
To be controllable the device must have an API.
As an example we will look at controlling a Sonoff switch flashed with the Tasmota firmware.
However it is applicable to any device that supports an HTTP API.
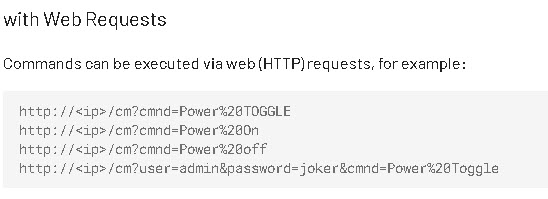
The Tasmota Githup page lists the available commands. We will concentrate on the simple on/off commands for illustration.
Because the Tasmota API only uses the GET method we can use a web browser.
The following is a screen shot from the Tasmota web page showing the commands we need.

I will illustrate this using both the web browser and curl.
The Tasmota devices use port 80 so we don’t need to enter it.
the command to toggle the switch is
http://192.168.1.192/cm?cmnd=Power%20TOGGLE
Note: %20= space character
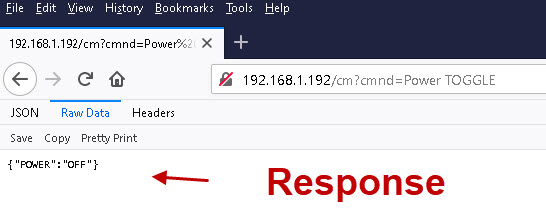
Just enter this is the browser as shown below:

The response is JSON encoded data showing the switch state..
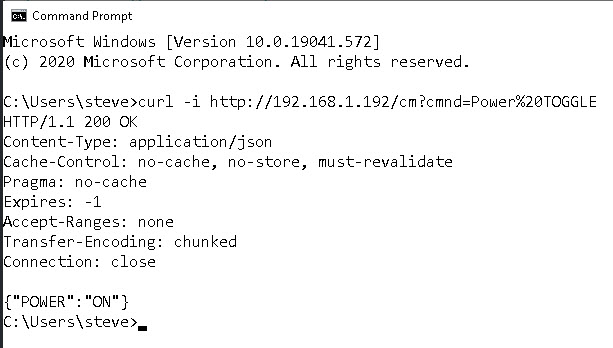
Using curl from the command line.

Notice the curl command displays the received headers.
Questions
Referring to the Tasmota screen shot of commands.
Q1 – What would I type into the web browser to turn the switch on and then off.
Q2 – What would I type into the web browser to turn the switch on and then off if the device used port 8080?
Resources:
Related Tutorials
- Controlling Smart Home Devices
- Understanding Smart Home APIs
- Controlling the Tasmota SonOff Switch with HTTP and Node-Red
Answers
Q1 –
http://192.168.1.192/cm?cmnd=Power%20ON
and
http://192.168.1.192/cm?cmnd=Power%20Off
Q2-
http://192.168.1.192:8080/cm?cmnd=Power%20ON
and
http://192.168.1.192:8080/cm?cmnd=Power%20Off
Note: the commands are not case sensitive in this case but often they are.