Although creating a wired Ethernet network isn’t expensive it is time consuming, involves basic DIY abilities, and making a mess.
It is because of this that it is best done when you have a completely new build or a major refurbishment.
There are many ways of extended your current network without drilling holes in walls and running Ethernet cables. See how to extend a home network.
However for those of you who are thinking of having it done ,or doing it yourself then I have put together these research notes that may help.
Getting Started
The first and most important part is creating a plan. You will need to consider:
- Will you have a Central distribution point? and Where will it be located.
- How many rooms will you wire?
- What are the Wiring routes?
- How many sockets (Ethernet outlets) in each room?
- Socket locations?
- Ethernet cable – Cat5, 6 or 7 Cable ? (cat 6 recommended)
- Will you use a patch panel?
- best way to run Ethernet cable?
Next you need to make a list of what you will need.
- Basic Tools e.g. drills etc
- Networking tools for crimping cables.
- UTP Ethernet cable (Cat 5,6 or 7)
- Termination sockets and connectors.
- Ethernet Switch or switches.
Ref: What are the requirements for a Home Network?
Networking Components Overview
Cable – For home networks cat 6 is probably the best choice today. CAT 7 (latest version) is shielded which adds complications to the installation.
Solid vs stranded cable – See here. For backbone cabling use solid.
RJ45 Connectors -Terminates the cable and plugs into a computer/switch/socket.
Wall-socket –Terminates the cable in a room and accepts RJ45 Connectors.
Wall face plates– These Cover wall sockets.
Keystone jacks These are female connectors that are usually mounted into a wall plate or patch panel.They are part of a wall socket,
Keystone plug is the matching male connector, usually attached to the end of a cable or cord.
Mixing Cat5 cables, jacks and Cat 6 cables and Keystone Jacks. – The general consensus it that it should work, but try not to do it. For example: Cat6 cable has a thicker copper wire and insulation and the cat6 jacks are made to take this into consideration.
Patch Panel and Wall Socket Types
Old type wall sockets and patch panels had the wiring connections as part of the socket/panel whereas newer ones tend to have holes that accept keystone jacks. If you watch a couple of the videos you will see these two types.
Home Ethernet Wiring Options
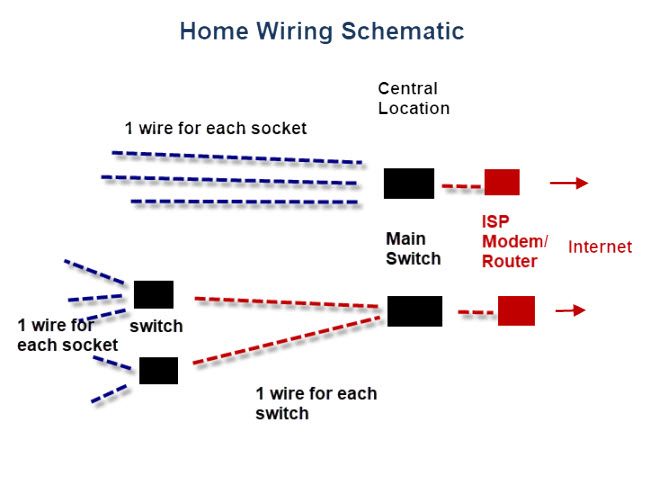
There are two main options as shown in the wiring diagram above.
You can bring the cables from all wall sockets to a central location. This is the option shown in most home wiring videos on Youtube.
The other option is to use several switches perhaps one per floor and wire those switches back to a central location.
This results in a potentially slower network, but it is the option chosen when cable routing isn’t inside the wall.
What is in the Central Location
This is where all of the cables from each of the room sockets come together, and plug into a switch.
You have two options for the cable ends:
- Wire into a patch panel ( most professional)
- Terminate with RJ-45 plug.
Using a patch panel gives you more flexibility, but is probably an overkill in a very small network.
Do you Need a Patch Panel?
The central location will most probably contain your ISP Router (Cable modem), but doesn’t have to.
Notes:
Label cables at the end in the central location as you need to know what room and socket they connect to.
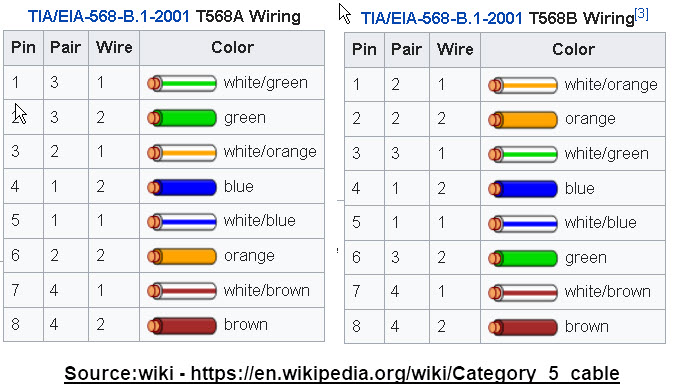
Wiring Standards
This is what cable colour is wired to what pin on the connectors.
There are two wiring standards in use ( 568A or 568B –wiki ). You should choose one and use it consistently everywhere.
568A is more common in Europe and Pacific countries
568B is more common in USA.
Estimated Costs Example
2 Storey house. 4 rooms 2 sockets per room (8 double sockets total).
- Cable run length approx 12m to each socket
- 16 runs = 192m
- 8 wall plates
- 16 keystone jacks
- switch minimum 16port but 24 port preferred.
- Patch Panel 2*24 port panels allows for expansion -Optional
- RJ45 Connectors
- Connector patch cables *16 or *32 (using patch panel)
If the wall plates have two terminations then that means double the cable and keystone jacks?
Cable 2*100m rolls £37 each= approx £74
Wall plates *8 at £4 each =£32
Keystone Jacks *16 at £8 per 8pack =£16
connector cables *16 at £8 per pack of 5 – £32
Sub Total = approx £154
Optional
Patch panel*2 (24port) at £22 each= £44
patch cables (0.3m) *16 at £8 per pack of 5 – £32
Total £230
Other extras that may be required:
Punch down and crimper tools,cable ties, Drill bits etc
Useful video clips
Keystone Jack and Wall Plate
How to Wire a Wall Socket
The video shows a wall socket with the cable terminations on the back
Terminate CAT5 and CAT 6 cable using RJ45 connectors
Should you use cat5,6 or 6A The first few minutes of this video explains the difference.
Running the Cable
In a new build this is easy but in an existing house without major renovations this is no simple task. If you are thinking of doing it than this video shows you how to use cable fishing tools.
Keystone Jack Wall Plate and Patch Panel
Solid vs stranded Cable
Wiring a Patch Panel
Wiring a Patch Panel
This patch panel uses keystone Jacks
Home Network Racks
Although not absolutely necessary a home network rack makes a home network Installation look professional.
Racks come as open and closed cabinet. They are 19inches wide and the height is give in Units U where 1U=1.75 inches(44.45mm).
The example below is 6U high. Depth can be important so you need to understand what will go inside.
The TP-Link switch shown later will fit as it is only44cms deep.

In addition the height of the cabinet is important as you may decide to put a UPS inside as shown in this video.
Rack Mounted Switch
The screen shot below shows a rack mounted TP-Link switch.
The TP-Link switch dimensions are 18 x 44 x 4.4cm which means it is 1U high

Here is a good video cable management and on wiring a rack
Common Questions and Answers
Q- How far can I run Ethernet cable from router or switch?
A- 100 metres
Q-How many Ethernet outlets or sockets per room?
A- Minimum 2
Q- What is the best way to run Ethernet cable through house?
A- Through the attic or crawl space.
Q- Can you run Ethernet cables next to power cables?
A-Ideally you shouldn’t but often you must, but keep the length short and try to separate them by about 8 inches if possible and use shielded cable if possible. see Can You Run Ethernet Cable Next to Electrical Cable?
References
- Structure cabling- Home installation
- How to Wire Your House With Cat5 or 6
- Wiring a Home Network from the ground up
Related Tutorials
- Understanding Home Networking Speeds
- Setting Up a Home Router
- VLANS on Home Networks
- Power Over Ethernet
Thanks a lot for the guide.
you say routing cables is easy in a new build – could you explain why? I will be moving into one shortly and need to figure out how to route cables from the ONT under the stairs all the way to the loft
Thanks
Hi
By new build I mean a build that is in progress as you have easy access to the wall and ceiling partitions. That doesn’t apply to a newly built house that you just purchased. Does that make sense? I probably need to make in clearer what I mean in the tutorial.
Rgds
Steve
Hi Steve,
Thanks for your work here, its great to understand things a bit better and you have helped. Much appreciated.
We are moving to a house with an annex (For the mother in law) and have a son that uses the internet for games etc and we have ordinary usage requirements and so does mother in law. The bungalow is long, but not one hundred meters i don’t think. We have tried the booster plugs (BT mini 2’s) but that doest appear to be robust enough. Would it be over the top to run an ethernet cable up and through the attic right to the other end and then use boosters from each end? Im aiming for what you describe in the Mesh system.
Thanks again,
Steve (thats me too)
Yes running a cable directly would do the trick.If you go for a mesh wi-fi then the cable would be the backhaul network so you need to chose a mesh that does have support for ethernet backhaul.
There is nothing stopping you from feeding the end of the cable into a switch at the far end.
I would go for router port < --wall-socket1->ethernet cable–>wall socket2->switch
wall-socket 1–>mesh node1
wall-scoker 2–>mesh node2
does that make sense?
Rgds
Steve
Hi Steve,
This page has been a brilliant resource thank you! I do have a few questions if you don’t mind. I live in a 2 bedroom ground floor flat in a converted victorian house. The previous copper connection was in the lounge furthest from the street. The connected the new 500MB fiber connection only to my room by the street as there were apparently too many 90 degree angles to get to the lounge. But the powerline which worked getting internet from the lounge to my room before, does not work so well the other direction (Netflix periodically buffering). So I am planning to run an ethernet cable from the ISP wifi router from my room through the wall to the second bedroom, then outside the house along the outside wall and into the lounge. There are still some old coaxial satellite tv cables running this route which I can pull out so don’t need to drill holes myself.
I want to run a stranded cat 6 cable from an ethernet port on my router through the wall to the other room up to the inside of the outside wall connecting to a wall switch. And from the lounge I think I need to run a solid copper shielded cat6 cable along the outside wall to terminate at the wall socket in the second bedroom.
If I also want an internet connection in the second bedroom, how do I do that? Connect the cable from the ISP router into a switch in the second bedroom, and a cable from the switch to the wall socket? Then a wired internet connection can be made to the switch as well as a wifi access point? I just want to ensure I get the best signal to the lounge for all my audiovisual needs. On the lounge side I will terminate in a wall socket and run a patch cable to a router that I have that I want to use in access point mode.
Glad you found the page useful.
If I understood correctly then you could put a switch in the second bedroom and feed the lounge and second bedroom from it. I would however run two cables from the router if possible. one to the lounge via the second bedroom and one to feed the seconds bedroom.
RGds
Steve
Yes that is the bit I am trying to understand. If I only have a 500Mb connection to my router and the router outputs 1Gb from every port, what would be the benefit of 2 cables to the bedroom, rather that one to a switch in the second bedroom? Am I diluting the signal with one cable? I would like to avoid 2 cables if I can due to aesthetics of a double run of cable along the skirting of my bedroom and the difficulty into having to widen the hole through 2 layers of brick wall.
think of it like lanes in a road. 2 cables = 2 lanes one for each room
1 lane from the router to a switch in the bedroom then two lanes from the switch.
So you have 2 lanes merging into 1 lane.
That said it will probably not make a difference as you still have 500Mbit/s for each leg.
So if you want the fastest possible go with 2 cables from the router otherwise just one with a switch will be fine as the Internet connection will probably be the speed limiter anyway.
Rgds
Steve
I am wiring new construction prior to sheetrock installation. I have searched many sites and yours has been the most helpful, thank you for your posts. What are your thoughts about running cat 6 or 7 through conduit? It’s a 3 story house with potentially 25-32 lines. Due to the structure I will probably need to go up 25 feet to an attic and as far as 35 feet across to reach the farthest rooms. After reading your posts I think it’s best not to use switches on each floor as I originally thought. I am thinking about running conduit for the larger vertical bundles, 8-10 cables per, and just stapling the horizontal runs. What is your advice, use conduit or not.
Hi
Not an expert on cabling as the post was a result of my research for my own project. I have done quite a bit of cabling however in my telecom days
Were possible I would always use conduit as it is easily to pull new cables through if needed.
As for cat 6 or 7 I would opt for cat 7 as usually there is little difference in the cable costs but not sure about that if you are having it installed.
I would also avoid switches on each floor unless you have a very convenient place to put them.
Good luck
Rgds
Steve
Yes going with cat 7. Thanks very much for you input.
HI Steve
I have just had an extension put in and my electrician has hard-wired me two ethernet cables from the route into the ceiling of my kitchen; we basically had no wifi on the other side of the house. Can you advise on the best access-points/devices to put into the kitchen to extend the wifi? We tried the ubiquiti wired access points but the app was awful and we just couldn’t connect to the internet.
Any help would be great.
Thanks
Matt
Personally I use TP-link. There are many to choose from the more you pay the higher the speed in general. However it is unlikely to matter for most as the traffic is going to the Internet which tends to be the slow link.
Unless you have special requirement I would go for the basic one but POE is very useful feature even if you currently don’t have a router that supports it. Here is the page on amazon
https://www.amazon.co.uk/Wireless-Access-Points-TP-LINK-Networking-Devices/s?keywords=Wireless+Access+Points&rh=n%3A430580031%2Cp_89%3ATP-LINK&c=ts&ts_id=430580031
Hi Steve,
I think I might have a bad cat6 cable in the wall, after testing the wire it failed on multiple lines. Would you have any recommendations how to pull a new cable through? For instance, old cable -> tie string -> new cable? Old cable -> new cable (soap head and send?) House was built in 2010, any tips you have would be great.
Thanks!
Joe
I must confess that I haven’t had to do it but That is what I would try but put some tape around the string so there are no edges that might snag.
You might find this interesting
https://onepullwire.com/6-tools-for-pulling-wire/
Good luck
Rgds
Steve